
wireshark traffic analysis#
Wireshark is a network protocol analyzer that lets you capture and interactively browse the traffic running on a computer network.

wireshark traffic analysis#
Wireshark is a network protocol analyzer that lets you capture and interactively browse the traffic running on a computer network. Project Goal: Document various network traffic analysis techniques using Wireshark, focusing on comparisons of different protocols (e.g., Telnet vs. SSH), capturing packets, and interpreting data.
Wireshark Traffic Analysis: Comparing Telnet and SSH
Table of Content
1. Introduction to Telnet and SSH
2. Capturing Telnet Traffic in Wireshark
3. Capturing SSH Traffic in Wireshark
4. Comparing Packet Structures
5. Filtering Telnet and SSH Traffic
6. Security Implications of Telnet vs. SSH
7. Conclusion
Introduction to Telnet and SSH
Telnet and SSH (Secure Shell) are two protocols used for remote
communication and network management. Both protocols allow users to
access and control devices over a network, but they differ significantly
in terms of security.
Telnet
Telnet is one of the earliest remote communication protocols, dating
back to the 1960s.
It operates on TCP port 23 and enables users to establish a connection
to remote devices.
Plaintext transmission: Telnet transmits data, including login
credentials and commands, in plaintext, making it vulnerable to
eavesdropping and Man-in-the-Middle attacks.
Due to its lack of encryption, Telnet is no longer considered secure and
is rarely used in modern systems.
SSH (Secure Shell)
SSH was developed as a more secure alternative to Telnet in 1995.
It operates on TCP port 22 and provides an encrypted channel for remote
communication.
Encryption: Unlike Telnet, SSH encrypts all data transmitted between the
client and server, protecting against potential attackers intercepting
sensitive information.
SSH uses public-key cryptography and supports secure authentication
mechanisms, making it a widely adopted standard for secure remote access
and network management.
Key Differences
Security: SSH offers encryption, while Telnet does not.
Usage: SSH is the preferred protocol for secure connections in modern
systems, while Telnet is mostly obsolete due to its security risks.
Capturing Telnet Traffic in Wireshark
In this section, we will demonstrate how to capture and analyze Telnet
traffic using Wireshark. Telnet traffic is transmitted in plaintext,
making it easy to observe sensitive information such as usernames and
passwords directly in the packet capture.
we shall be using cisco lab to do the job
Step 1: Setting Up a Telnet Session
To capture Telnet traffic, you first need to establish a Telnet connection between two devices.
Install Telnet client: Ensure that you have a Telnet client installed on your system. On Linux, you can install it by running:
sudo apt-get install telnet
For Windows, you may need to enable Telnet through the Control Panel under “Turn Windows features on or off.”
Open Telnet connection: Connect to a remote device or server via Telnet using the following command:
telnet <server-ip> <port>
Replace <server-ip> with the IP address of the server and <port>
with the port (default is 23).
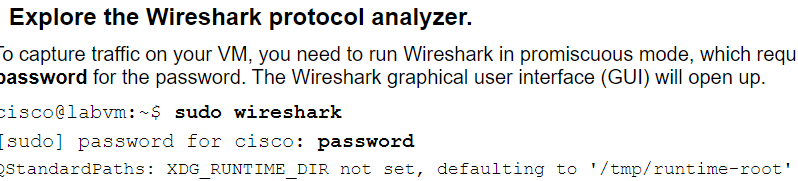
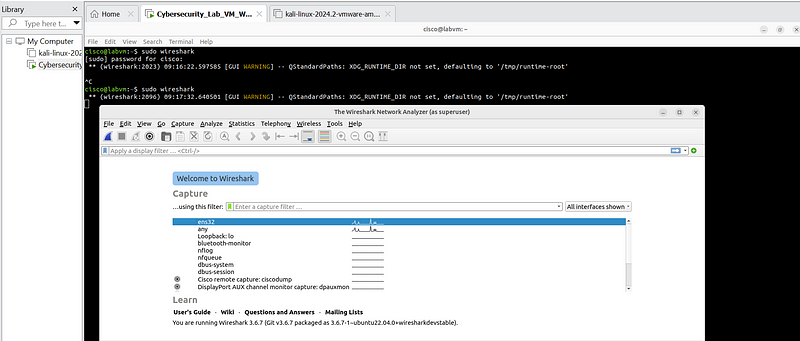
Step 2: Starting Wireshark Capture
Open Wireshark: Launch Wireshark on the device where you want to capture
the traffic.
Select the network interface: Choose the appropriate network interface
(e.g., Ethernet, Wi-Fi) that is being used for the Telnet connection.
Start capturing: Click the blue shark fin icon to start capturing
packets.
Apply a capture filter (optional): To focus on Telnet traffic only, you
can apply a capture filter for Telnet using:tcp port 23
open wireshark through:
display after logging in in the above screenshort code.
we shall be capturing some packets by opening firefox :
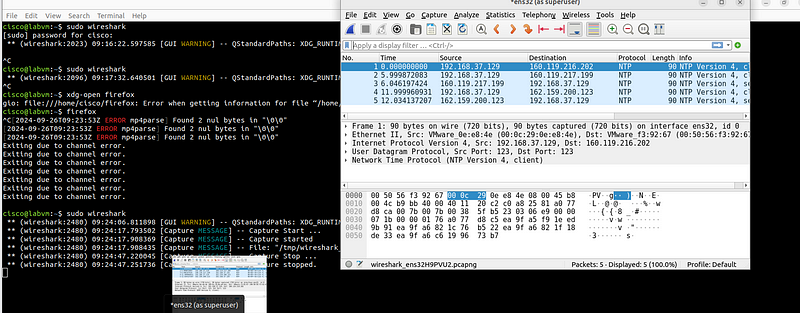
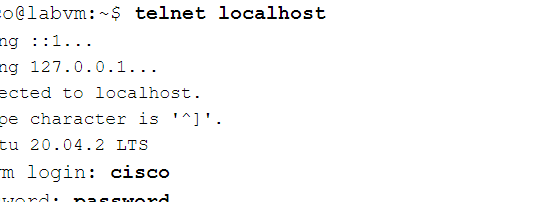
Step 3: Establish the Telnet Connection
Authenticate: After starting the Wireshark capture, go back to the
Telnet session and log in to the remote device by providing a username
and password.
use logging details below:
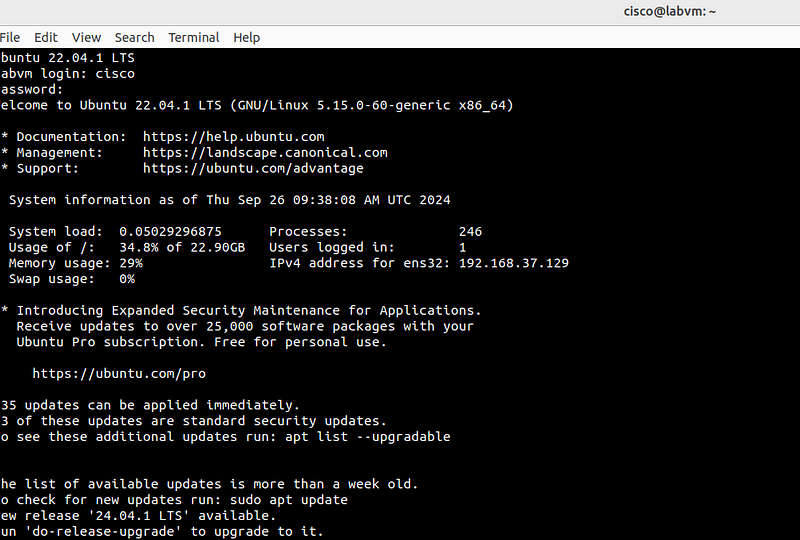
after logging in it will display:
Step 4: Stop the Capture and Analyze the Traffic
Stop capturing: Once you’ve completed your Telnet session, go back to
Wireshark and stop the capture by clicking the red square icon.
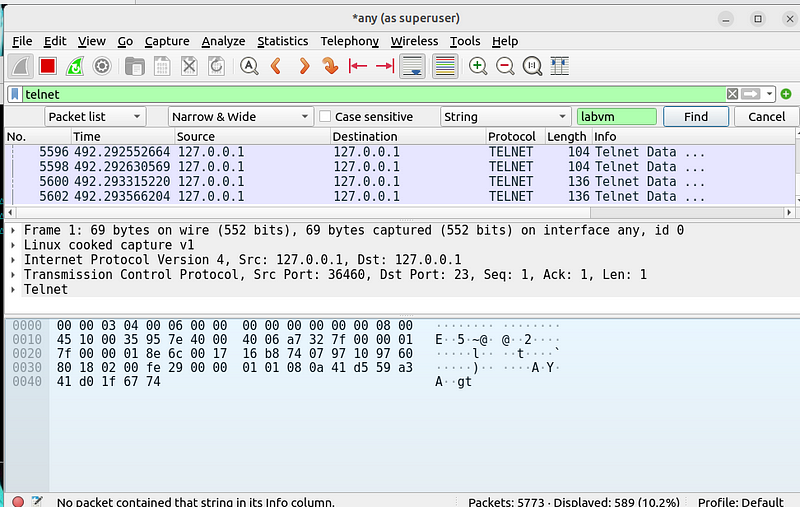
Filter Telnet traffic: Apply a display filter to isolate Telnet traffic:
telnet
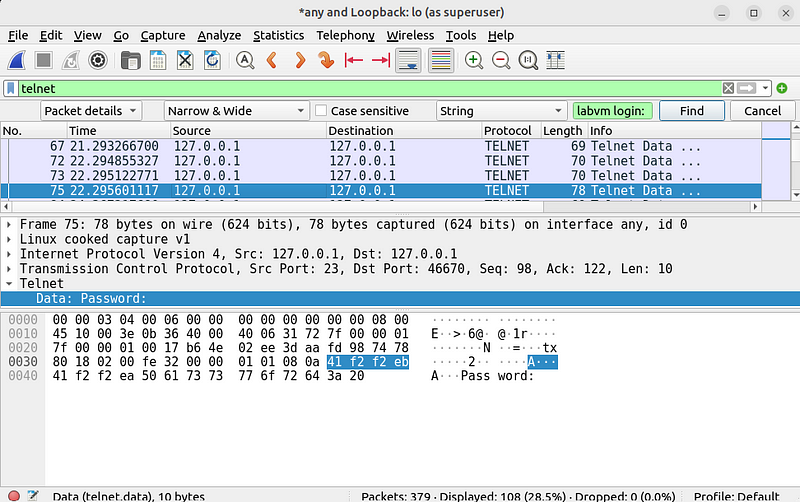
Click the arrows next to Display filter and change it to String. Then click the arrows next to Packet list and change it to Packet details.
To find the packet requesting login information, type labvm login: in the field next to String, and then press Enter or click Find. Wireshark will highlight the packet that contains the “labvm login:” text string.
In the Packet Details pane, click the arrow next to Telnet to expand its content. You should see that labvm login: is the data for this packet. The data for the packet is also shown in Packet Bytes pane. You can tell that the text was sent unencrypted because you can read it.
Examine packets: Scroll through the captured packets and focus on the
ones containing Telnet protocol. You should be able to see the data
transmitted in plaintext, including:
Login credentials (username and password).
Commands typed during the Telnet session.
Responses from the server.
Example of Captured Telnet Data
In Wireshark, you can view the raw contents of Telnet packets under the “Packet Details” pane. The plaintext data will be visible under the “Data” section, showing the commands and responses clearly.
Security Implications of Telnet
This demonstration highlights one of the biggest security flaws of
Telnet: all data is transmitted without encryption, which makes it easy
for attackers to intercept sensitive information like passwords and
commands. This is why Telnet is rarely used in modern networks, and why
SSH is preferred for secure communication.
3. Capturing SSH Traffic in Wireshark
In this section, we will capture and analyze SSH traffic using
Wireshark. Unlike Telnet, SSH encrypts all communication between the
client and server, making it impossible to see sensitive information
such as passwords or commands in plaintext. This is one of the key
reasons why SSH is the preferred protocol for secure remote connections.
Step 1: Setting Up an SSH Session
To capture SSH traffic, you first need to establish an SSH connection
between two devices.
Install SSH client: Ensure that an SSH client is installed on your
system. On most Linux systems, OpenSSH is pre-installed. On Windows, you
can use PuTTY or enable OpenSSH through PowerShell.
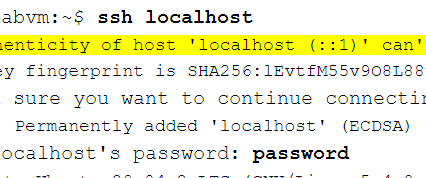
Open an SSH connection: Connect to a remote server via SSH by running
the following command (on Linux/macOS):
ssh <username>@<server-ip>
Replace <username> with your SSH username and <server-ip> with the server’s IP address.
EXAMPLE:
Step 2: Starting Wireshark Capture
Open Wireshark: Launch Wireshark on the device where you will capture
the SSH traffic.
Select the network interface: Choose the appropriate network interface
(Ethernet, Wi-Fi) for the SSH connection.
Start capturing: Click the blue shark fin icon to start capturing
packets.
Apply a capture filter (optional): To focus only on SSH traffic, you can
apply a capture filter:
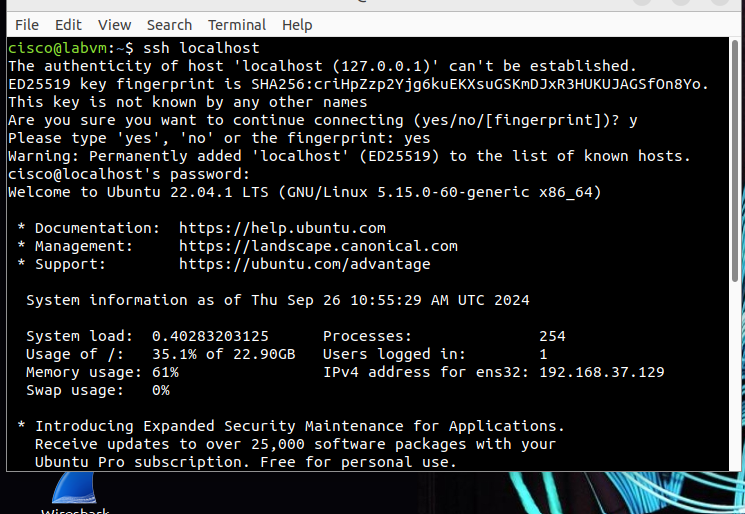
Step 3: Establish the SSH Connection
Authenticate: After starting the Wireshark capture, go back to your
terminal and log in to the remote server using your SSH credentials.
Step 4: Stop the Capture and Analyze the Traffic
Stop capturing: Once you’re done with your SSH session, go back to
Wireshark and stop the capture by clicking the red square icon.
Filter SSH traffic: Apply a display filter to isolate SSH traffic:
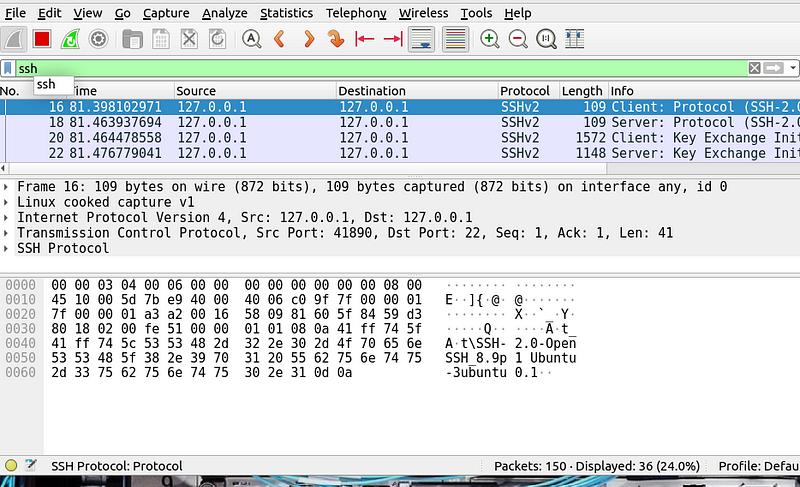
the above image show encrypted packet as compared to telnet.
Examine packets: Review the captured packets in Wireshark. Unlike
Telnet, SSH traffic is encrypted, so you won’t be able to see the
plaintext commands or responses. The data is encapsulated within
encrypted SSH packets.
Key Observations
Encrypted data: You’ll notice that SSH packets contain encrypted data
that cannot be interpreted directly from the capture. The packet
contents will show random data (ciphertext), unlike Telnet’s readable
plaintext.
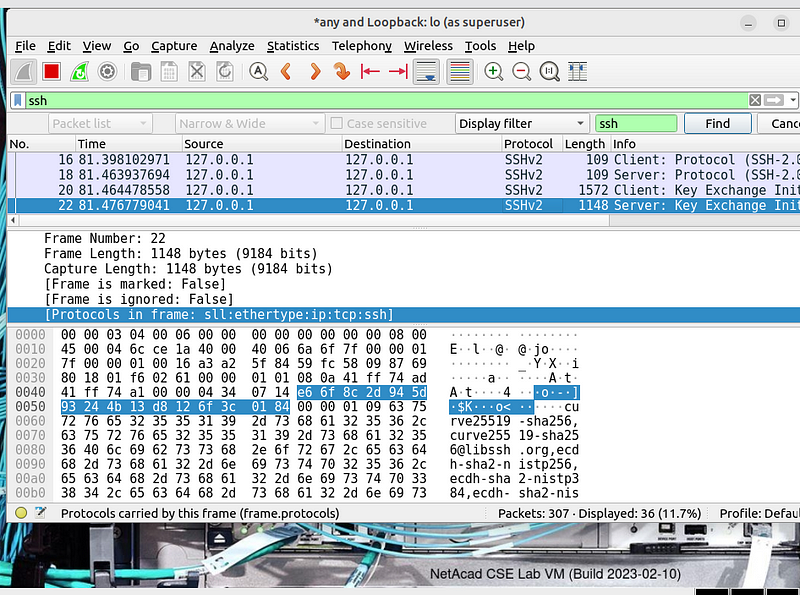
Handshake: In the initial packets of an SSH session, you may observe the
key exchange process, which sets up the encrypted communication channel
between the client and server. This is a vital part of SSH’s security
architecture.
Packets: Look for packets labeled SSH under the “Protocol” column, which
indicates SSH traffic. You can view the details of the packets, but you
won’t be able to decipher the actual data being transmitted.
Security Implications of SSH
The encryption used by SSH ensures that even if attackers capture the
traffic, they cannot read sensitive information such as login
credentials, commands, or other data being transmitted. This makes SSH a
secure choice for remote communication compared to Telnet, which
transmits everything in plaintext.
4. Comparing Packet Structures
In this section, we will compare the packet structures of Telnet and SSH
as captured in Wireshark. The key difference between these two protocols
is how they handle security and encryption. Telnet transmits data in
plaintext, allowing anyone to read the information, while SSH encrypts
its traffic, making it unreadable to outsiders.
Telnet Packet Structure
Telnet packets are simple and consist of plaintext data that is easy to
read. Here’s a breakdown of the typical Telnet packet captured in
Wireshark:
Ethernet Frame: Contains information about the source and destination
MAC addresses.
IP Header: Includes the source and destination IP addresses, and other
network-layer details.
TCP Header: Handles the connection via TCP, identifying the source and
destination ports (Telnet uses TCP port 23).
Telnet Data:
Command: Commands sent by the user, such as ls or pwd, are visible in
plaintext.
Credentials: If you capture a login session, you can see the username
and password transmitted without encryption.
Example (Telnet)
In a Telnet session, packets containing commands and responses will show
up in Wireshark’s Packet Details pane under “Telnet.” The data within
the packets is directly readable as shown below:
Command: ls appears as plaintext.
Username: Sent in plaintext during login.
Password: Sent in plaintext, visible in Wireshark.
SSH Packet Structure
SSH packets are more complex, as they are encrypted to ensure
confidentiality. Here’s a breakdown of the typical SSH packet structure:
Ethernet Frame: Like Telnet, it contains the MAC addresses of the source
and destination devices.
IP Header: Similar to Telnet, this includes the source and destination
IP addresses.
TCP Header: Identifies the source and destination ports (SSH uses TCP
port 22).
SSH Data:
Encrypted Data: Unlike Telnet, SSH encrypts all commands and data. The
payload in the packet is not readable without decryption. This is due to
SSH’s use of encryption algorithms like AES, RSA, or ECDSA.
Key Exchange: In the initial packets of an SSH session, you’ll see a key
exchange process, which helps set up the encryption for the session.
Example (SSH)
In Wireshark, the SSH packets contain encrypted data, so you cannot view
the actual commands or login credentials as plaintext. Instead, you will
see something like this:
Command: The command ls appears as encrypted data in the packet
payload.
Username/Password: Unlike Telnet, this information is encrypted and not
visible to the packet analyzer.
Visual Comparison in Wireshark
Telnet:
Select a packet from your Telnet capture in Wireshark.
In the Packet Details pane, expand the Telnet section to see the
commands and other data in plaintext.
The Packet Bytes pane will display the raw data, which is
human-readable.
SSH:
Select a packet from your SSH capture.
In the Packet Details pane, you will see the SSH protocol, but the data
will be encrypted and unreadable.
The Packet Bytes pane will show encrypted data, with no plaintext
visible.
Key Differences
Readability:
Telnet: Plaintext data, easily viewable in Wireshark.
SSH: Encrypted data, not human-readable.
Security:
Telnet: Vulnerable to eavesdropping, as all data is transmitted in
plaintext.
SSH: Secure communication, as all data is encrypted.
Conclusion
This comparison highlights the critical difference in packet structures
between Telnet and SSH. Telnet’s lack of encryption makes it an insecure
protocol for transmitting sensitive information. On the other hand, SSH
uses encryption to secure the communication channel, preventing
unauthorized access to the data transmitted.
5. Filtering Telnet and SSH Traffic
Wireshark provides powerful filtering capabilities that allow users to
focus on specific types of network traffic. In this section, we will
cover how to apply filters to isolate Telnet and SSH traffic, making it
easier to analyze and compare the two protocols.
Filtering Telnet Traffic
Since Telnet uses TCP port 23 by default, we can apply filters to narrow
down our capture to only Telnet traffic.
Steps to Filter Telnet Traffic:
Open Wireshark: Load the packet capture file (or live capture) that
contains Telnet traffic.
Apply a filter: Enter the following filter in the Wireshark filter bar:
bash
Copy code
tcp.port == 23
This filter will display only packets that are using TCP port 23, which
is the default port for Telnet.
Analyze the results:
Once the filter is applied, you will see packets containing Telnet
traffic.
Look for commands, login credentials, and responses, which should be
visible in plaintext.
Common Telnet Filters:
Display only Telnet packets:
bash
Copy code
telnet
Filter Telnet packets between two specific IP addresses:
bash
Copy code
ip.src == <source-ip> && ip.dst == <destination-ip> && tcp.port ==
23
Replace <source-ip> and <destination-ip> with the appropriate IP
addresses.
Example Filter for Telnet Session:
If you’re analyzing traffic between two IP addresses during a Telnet
session, you could use:
bash
Copy code
ip.addr == 192.168.1.100 && tcp.port == 23
Filtering SSH Traffic
SSH typically operates on TCP port 22, so we can use filters to isolate
SSH traffic for analysis.
Steps to Filter SSH Traffic:
Open Wireshark: Load the packet capture file or start a live capture
that includes SSH traffic.
Apply a filter: Enter the following filter in the Wireshark filter bar:
bash
Copy code
tcp.port == 22
This will display only packets that are using TCP port 22, which is the
default port for SSH.
Analyze the results:
Unlike Telnet, the packet contents will be encrypted, so you won’t be
able to read the data directly.
You can observe key exchanges, session establishment, and encrypted
payloads.
Common SSH Filters:
Display only SSH packets:
bash
Copy code
ssh
Filter SSH packets between specific IP addresses:
bash
Copy code
ip.src == <source-ip> && ip.dst == <destination-ip> && tcp.port ==
22
Replace <source-ip> and <destination-ip> with the appropriate IP
addresses.
Example Filter for SSH Session:
If you’re capturing SSH traffic between two IP addresses, you could use:
bash
Copy code
ip.addr == 192.168.1.100 && tcp.port == 22
Combined Filtering: Telnet and SSH
If you want to filter both Telnet and SSH traffic within a single
capture, you can combine the filters.
Combined Telnet and SSH Filter:
bash
Copy code
tcp.port == 23 || tcp.port == 22
This filter will display all packets using either TCP port 23 (Telnet)
or TCP port 22 (SSH).
Observing Differences in Traffic:
Telnet Traffic: When filtering Telnet traffic, you will be able to view
the plaintext communication between the client and server, including
login credentials and commands.
SSH Traffic: When filtering SSH traffic, the communication will be
encrypted, and while you can see packet exchanges, the actual contents
are hidden.
Conclusion
Using Wireshark’s filtering capabilities, you can easily isolate Telnet
and SSH traffic based on their respective ports (23 and 22). These
filters allow you to focus on specific protocol traffic for deeper
analysis, highlighting the clear differences in how the two protocols
handle data transmission — one in plaintext (Telnet), and the other
encrypted (SSH).
6. Security Implications of Telnet vs. SSH
Understanding the security implications of Telnet and SSH is crucial for
making informed decisions about remote communication protocols. While
both serve similar purposes, their security features differ
significantly.
Telnet Security Implications
Plaintext Transmission:
Data Exposure: Telnet transmits all data, including login credentials,
commands, and responses, in plaintext. This makes it easy for anyone
with network access to intercept and read this data.
Eavesdropping: Attackers using network sniffing tools can capture and
decode Telnet traffic, potentially gaining access to sensitive
information such as usernames, passwords, and commands.
No Encryption:
Vulnerability to Attacks: Without encryption, Telnet is vulnerable to
Man-in-the-Middle (MitM) attacks, where an attacker intercepts and
potentially alters the communication between the client and server.
Compliance Issues: Many regulatory standards and security best practices
require encryption of sensitive data. Telnet’s lack of encryption makes
it unsuitable for use in environments where data security and compliance
are a concern.
Obsolescence:
Limited Use: Due to its security shortcomings, Telnet has largely been
replaced by more secure protocols. Its use is now limited to legacy
systems or environments where security is not a primary concern.
SSH Security Implications
Encryption:
Data Protection: SSH encrypts all data transmitted between the client
and server, including login credentials, commands, and responses. This
encryption ensures that even if the traffic is intercepted, the data
remains secure and unreadable.
Secure Authentication: SSH supports multiple authentication methods,
including password-based and key-based authentication, providing
flexibility and enhanced security.
Integrity and Confidentiality:
Integrity Checks: SSH uses cryptographic methods to ensure the integrity
of the data being transmitted. This prevents unauthorized alterations of
the data during transmission.
Confidentiality: Encryption ensures that data remains confidential,
protecting sensitive information from unauthorized access.
Protection Against Attacks:
Man-in-the-Middle Protection: SSH includes mechanisms to prevent MitM
attacks, such as verifying the server’s public key before establishing a
connection.
Strong Security Measures: SSH incorporates various security features,
including encryption algorithms (e.g., AES, RSA) and secure key exchange
protocols, to protect against a wide range of attacks.
Compliance:
Regulatory Standards: SSH meets many regulatory and security standards
that require encryption and secure communication. It is widely accepted
in modern systems for remote access and management.
Conclusion
In summary, Telnet’s lack of encryption and plaintext transmission make
it unsuitable for secure communication, especially in environments
requiring data protection and compliance. SSH, with its robust
encryption and secure authentication mechanisms, provides a secure
alternative for remote communication, ensuring confidentiality and
integrity of the transmitted data.
7. Conclusion
In this analysis of Telnet and SSH, we have examined the fundamental
differences between these two protocols in terms of their packet
structures, security implications, and practical use cases.
Summary of Findings
Packet Structures:
Telnet: Transmits data in plaintext, making it easy to observe and
interpret commands, credentials, and responses directly from Wireshark
captures. This transparency highlights the protocol’s significant
security weaknesses.
SSH: Employs encryption to protect all transmitted data, rendering it
unreadable to anyone intercepting the traffic. The encrypted packets,
visible in Wireshark, emphasize SSH’s focus on confidentiality and
security.
Security Implications:
Telnet: The lack of encryption in Telnet makes it highly vulnerable to
eavesdropping and other forms of cyberattacks. Its use is generally
discouraged in modern systems due to these significant security risks.
SSH: Provides a secure communication channel through encryption,
protecting data integrity and confidentiality. SSH is widely adopted for
its robust security features, including encrypted data transmission and
secure authentication.
Practical Recommendations
Avoid Using Telnet: Given its security vulnerabilities, Telnet should be
avoided in favor of more secure alternatives. It is suitable only for
legacy systems or controlled environments where security is not a
concern.
Adopt SSH for Secure Communication: SSH is the recommended choice for
remote access and network management due to its strong encryption and
secure authentication methods. It ensures that sensitive data remains
protected against unauthorized access and cyber threats.
Final Thoughts
This comparison underscores the importance of using secure protocols for
remote communication. SSH offers a modern, secure approach to managing
remote connections, while Telnet’s vulnerabilities highlight the need
for transitioning to better security practices. By understanding these
protocols and their implications, you can make informed decisions to
enhance your network’s security posture and protect against potential
threats.
By Kiplagatkelvin{.p-author .h-card} on September 26, 2024.
Canonical link{.p-canonical}
Exported from Medium on February 13, 2025.