
understanding Public Key Infrastructure (PKI) and Certificate Management for Secure Web Transactions#

Public Key Infrastructure (PKI) and Certificate Management
Public Key Infrastructure (PKI) is a system that facilitates secure communications and digital signatures using pairs of cryptographic keys — public and private. PKI includes key components such as certificate authorities (CAs), which issue digital certificates that link a user’s identity to their public key, establishing trust in online transactions.
Key Components of PKI:
- Public and Private Keys: Asymmetric keys used for secure communication and authentication.
- Digital Certificates: Electronic documents issued by CAs that confirm a user’s identity and contain the public key.
- Certificate Authorities (CAs): Trusted entities responsible for issuing and managing certificates.
Certificate Management involves overseeing the entire lifecycle of a digital certificate, including:
- Issuance: Creating and validating certificates through CAs.
- Deployment: Installing certificates on servers to enable secure connections.
- Renewal and Expiration: Tracking and renewing certificates before they expire.
- Revocation: Invalidating compromised certificates and updating users through Certificate Revocation Lists (CRLs).
- Auditing: Regularly reviewing certificate usage to ensure compliance with security policies.symmetric and asymmetric encryption
1. Symmetric Encryption#
In symmetric encryption, the same key is used for both encryption and decryption. This type of encryption is typically fast and suitable for large data sets but requires secure key distribution.
Process:
- The sender encrypts the message using a shared secret key.
- The encrypted message is sent to the receiver.
- The receiver decrypts the message using the same key.
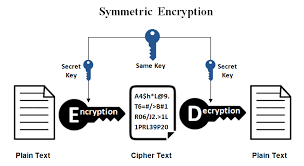
Key Challenge: Securely sharing the symmetric key between sender and receiver.
2. Asymmetric Encryption#
In asymmetric encryption, two different but mathematically related keys are used: a public key for encryption and a private key for decryption. The public key is shared openly, while the private key is kept secret.
Process:
- The sender encrypts the message using the recipient’s public key.
- The encrypted message is sent to the receiver.
- The receiver decrypts the message using their private key.

Key Advantage: No need to share a secret key; only the private key must remain secure.
Both methods are crucial in cybersecurity, with symmetric encryption being efficient for bulk data encryption and asymmetric encryption providing secure key exchanges and digital signatures.
Proof of concepts:#
symmetrical Encryption using openSSL#
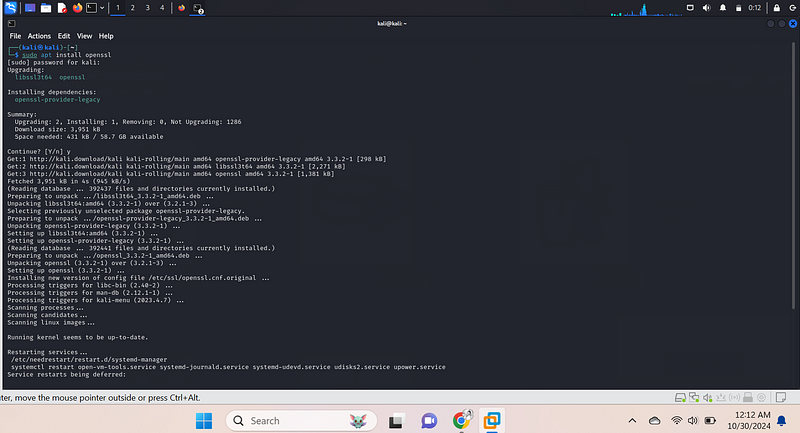
Step 1: Generate a Symmetric Key#
For symmetric encryption with OpenSSL, we can use a passphrase as a key instead of generating a separate key file.
But we must install openssl or check if it is already install:
Step 2: Encrypt a Message with a Symmetric Key#
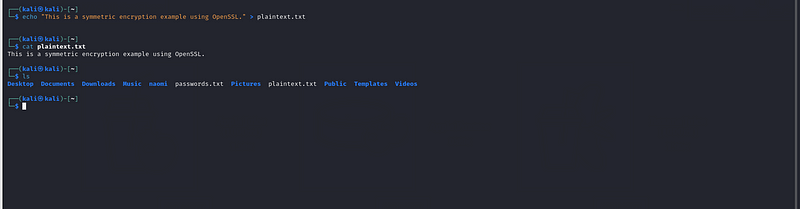
- Create a Plaintext File:
Let’s start by creating a sample plaintext file. Run the following command to create it:
echo "This is a symmetric encryption example using OpenSSL." > plaintext.txt{.markup–code
.markup–p-code}
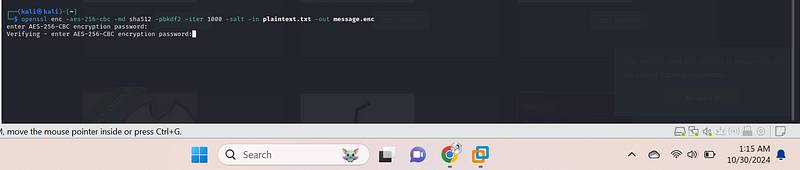
2. Encrypt the File:
Use the openssl enc{.markup–code .markup–p-code} command to encrypt
the file with a passphrase. Here’s an example with AES-256-CBC, a common
symmetric encryption algorith
openssl enc -aes-256-cbc -md sha512 -pbkdf2 -iter 1000 -salt -in plaintext.txt -out message.enc.

Explanation:
This command encrypts a file named plaintext.txt{.markup–code
.markup–p-code} using the Advanced Encryption Standard (AES) with a
256-bit key size in Cipher Block Chaining (CBC) mode.
Here’s a breakdown of the options used:
-aes-256-cbc{.markup–code .markup–li-code}: Specifies the encryption algorithm (AES-256-CBC).-md sha512{.markup–code .markup–li-code}: Uses SHA-512 as the message digest algorithm for key derivation.-pbkdf2{.markup–code .markup–li-code}: Employs the Password-Based Key Derivation Function 2 (PBKDF2) to derive a cryptographic key from the user-provided passphrase.-iter 1000{.markup–code .markup–li-code}: Sets the number of iterations for the PBKDF2 algorithm. A higher iteration count increases the security of the derived key.-salt{.markup–code .markup–li-code}: Adds a random salt to the encryption process, making it more resistant to dictionary attacks.-in plaintext.txt{.markup–code .markup–li-code}: Specifies the input file to be encrypted.-out message.enc{.markup–code .markup–li-code}: Specifies the output file containing the encrypted data.
The encrypted output is saved as message.enc{.markup–code
.markup–p-code}. You will be prompted to enter a password, which is
required to decrypt the file later.
Step 3: Decrypt the Message with the Same Symmetric Key#
To decrypt the message, we use the same command but with the
-d{.markup–code .markup–p-code} (decrypt) option:
openssl enc -aes-256-cbc -md sha512 -pbkdf2 -in message.enc -out plaintext.txt -d

Explanation:
-d{.markup–code .markup–li-code} tells OpenSSL to decrypt.- The rest of the parameters are similar to encryption but with the output going to plaintext.txt
When you run this command, OpenSSL prompts you to enter the password
that was used during encryption. Upon entering the correct password,
message.enc{.markup–code .markup–p-code} will be decrypted, and
its original content will be saved to plaintext.txt If an incorrect
password is entered, decryption will fail, and the content will remain
inaccessible.

Asymmetrical encryption using openSSL#
Asymmetric encryption example using OpenSSL. In asymmetric encryption, we use a pair of keys: a public key to encrypt data and a private key to decrypt it. This is useful for scenarios like secure message exchanges, SSL/TLS, and digital signatures.
Steps for Asymmetric Encryption Using OpenSSL#
We’ll go through generating a key pair, encrypting a message with the public key, and decrypting it with the private key.
Step 1: Generate a Private Key#
- Generate an RSA Private Key:
- Run the following command to create a 2048-bit RSA private key
(saved as
private_key.pem{.markup–code .markup–li-code})
openssl genpkey -algorithm RSA -out private_key.pem -aes256{.markup–code
.markup–p-code}
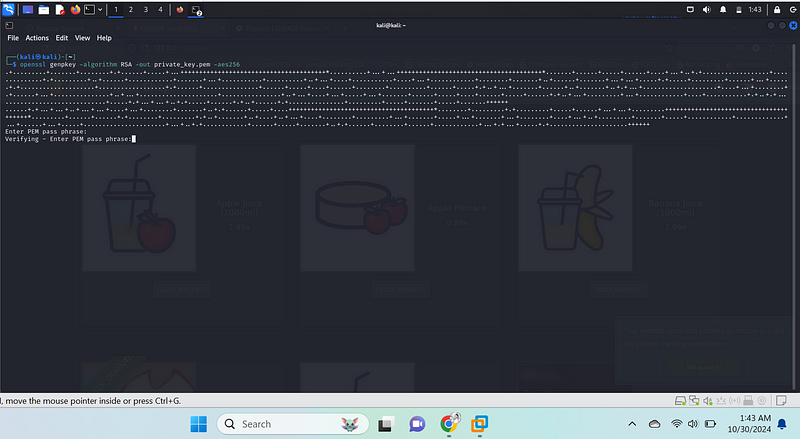
You’ll be prompted to enter a passphrase to protect the private key file.
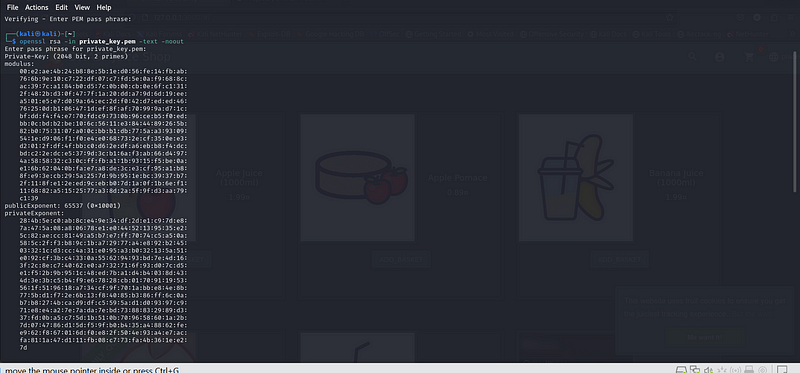
Check the Key (Optional):
To view the private key details, you can use:
openssl rsa -in private_key.pem -text -noout
Step 2: Extract the Public Key from the Private Key#
- Generate a Public Key:
Using the private key, extract the public key
This will create a file named public_key.pem{.markup–code
.markup–p-code} containing the public key.
openssl rsa -in private_key.pem -pubout -out public_key.pem

2. Check the Public Key (Optional):
To view the public key details, you can use:
openssl rsa -pubin -in public_key.pem -text -noout

Step 3: Encrypt a Message Using the Public Key {#
- Create a Plaintext File:
Let’s create a plaintext file to encrypt:
echo "This is an example of asymmetric encryption using OpenSSL." > message.txt{.markup–code
.markup–p-code}

2. Encrypt the Message:
Use the public key to encrypt the message
openssl pkeyutl -encrypt -pubin -inkey public_key.pem -in message.txt -out encrypted_message.bin
Explanation:#
openssl{.markup–code .markup–li-code}: Command-line tool for OpenSSL, used for cryptographic operations.pkeyutl{.markup–code .markup–li-code}: Utility for performing operations using public/private keys.-encrypt{.markup–code .markup–li-code}: Indicates that you are encrypting data.-pubin{.markup–code .markup–li-code}: Specifies that the input key is a public key.-inkey public_key.pem{.markup–code .markup–li-code}: The file containing the public key used for encryption.-in message.txt{.markup–code .markup–li-code}: The plaintext file containing the message you want to encrypt.-out encrypted_message.bin{.markup–code .markup–li-code}: The file where the encrypted message will be saved.
Step 4: Decrypt the Message Using the Private Key#
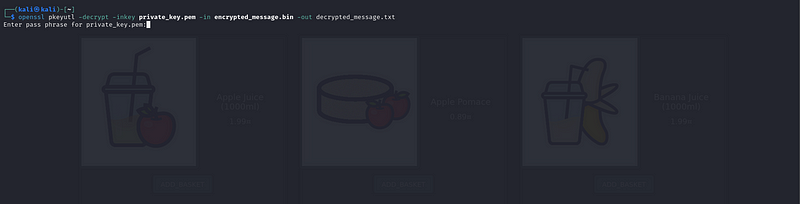
- Decrypt the Encrypted Message:
Use the private key to decrypt the message:
openssl pkeyutl -decrypt -inkey private_key.pem -in encrypted_message.bin -out decrypted_message.txt
it will prompt for a password
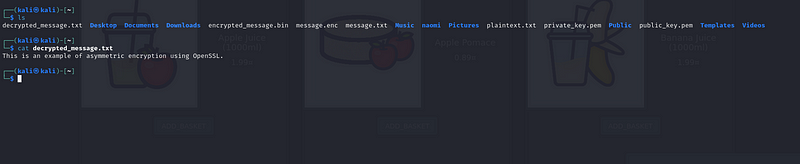
2.View the Decrypted Message:
- To check if decryption was successful, view the content of
decrypted_message{.markup–code .markup–li-code}
cat decrypted_message.txt{.markup–code .markup–p-code}
- Ensure that you have generated the
private_key.pem{.markup–code .markup–li-code} andpublic_key.pem{.markup–code .markup–li-code} files correctly and that they are accessible in the current directory. - The data encrypted with RSA has limitations on size. For larger messages, consider using hybrid encryption (encrypting a message with a symmetric key and then encrypting that key with RSA).
Scenario: Secure Communication Between John and Jane#
Here’s the revised scenario using John and Jane for secure communication:#
Scenario: Secure Communication Between John and Jane
Background
John and Jane want to communicate securely over the internet to exchange
sensitive information, such as personal data or confidential business
information. To achieve this, they will use asymmetric encryption to
ensure that only the intended recipient can read the messages.
Step-by-Step Process
1.Key Generation:
John and Jane each generate a pair of cryptographic keys:
John generates his own public and private keys. He keeps his private
key secure and shares his public key with Jane.
Jane does the same, generating her own public and private keys.
2. Public Key Exchange:
John sends his public key to Jane, and Jane sends her public key to
John. This exchange can occur over an insecure channel since the public
keys do not need to be kept secret.
3. Message Encryption:
When John wants to send a secure message to Jane, he follows these
steps:
John writes his message(e.g., “Hello Jane, this is a secret message.”).
He encrypts the message using Jane’s public key with the following
OpenSSL command:
openssl pkeyutl -encrypt -pubin -inkey jane_public_key.pem -in
message.txt -out encrypted_message.bin
The encrypted message is now secure, as it can only be decrypted with
Jane’s private key.
4. Sending the Encrypted Message:
John sends the encrypted_message.bin file to Jane through an email or
messaging service.
5. Message Decryption:
Upon receiving the encrypted message, Jane uses her private key to
decrypt it:
openssl pkeyutl -decrypt -inkey jane_private_key.pem -in
encrypted_message.bin -out decrypted_message.txt
Jane can now read the original message, which confirms that it came from
John and remains confidential.
6. Acknowledgment and Response:
Jane can respond securely by encrypting her message with John’s public
key, following the same steps as above. This ensures that only John can
decrypt and read Jane’s response.
7. Securing the Connection with SSL/TLS:
For ongoing secure communication, John and Jane can also establish an
SSL/TLS connection:
They can use an SSL/TLS protocol to create a secure channel over the
internet.
This involves obtaining a digital certificate from a trusted
Certificate Authority (CA) and using it to encrypt their communication
session.
With this setup, any data sent during the session is encrypted,
providing confidentiality and integrity.
Conclusion
Through the use of asymmetric encryption and SSL/TLS protocols, John and
Jane ensure their communication remains private and secure from
eavesdroppers. By leveraging public and private key pairs, they can
confidently exchange sensitive information, knowing that only the
intended recipient can access the messages. This scenario highlights the
importance of cryptographic techniques in securing communications in
today’s digital landscape.
By Kiplagatkelvin{.p-author .h-card} on October 29, 2024.
Canonical link{.p-canonical}
Exported from Medium on February 13, 2025.