
#🕵️♂️ TryHackMe: OhSINT — My OSINT Investigation Walkthrough
📌 Introduction#

In this challenge, I explored the basics of Open Source Intelligence (OSINT) — using publicly available data to discover useful information about a target. This is an essential skill in cybersecurity, penetration testing, and digital forensics. The goal was to analyze an image file and answer 7 investigative questions by tracing the digital footprint of the individual behind it. The process helped me understand how seemingly harmless online data can be pieced together to reveal much more than expected.
🛠️ Tools Used & Their Purpose#
| Tool | Purpose |
|---|---|
ExifTool | Extract metadata from the image file to identify hidden information. |
| Search for usernames, emails, and social media links. | |
| View tweets and extract data like BSSID. | |
| GitHub | Identify user projects, locations, and personal email. |
| WordPress | Analyze blog content and hidden text in source code. |
| Wigle.net | Trace the BSSID to identify SSID and physical location. |
| Web browser developer tools | Inspect source code to uncover hidden passwords. |
Each of these tools played a critical role in proving that a small piece of data (like a username or metadata) can lead to sensitive personal information such as email, password, location, or even the network a user connects to.
To get started, i needed to get the Task Files. Just click the blue button at the top of Task 1 that says ‘Download Task Files,’ like you can see in the picture below.

This action will enable us to obtain an image file called “WindowsXP.jpg”, which is shown below.

If you see the image, you will find that there is no information available from the given image.so there is this saying that an image displays 1000 word so let proceed and see i hope you will enjoy.
🖼️ Step 1: Download and Analyze the Image#
I downloaded the task files, which included a JPEG image called WindowsXP.jpg. Running it through ExifTool gave me key metadata.
I discovered the name OWoodflint in the copyright field — a great lead.

Q1: What is this user’s avatar of?#
Answer: A cat
🗒️ Explanation:
I Googled the username OWoodflint and found a Twitter account. The profile picture was a cat, which answered the question.

i clicked the twitter linked and the AVATAR PROFILE was a cat

Q2: What city is this person in?#
Answer: London
🗒️ Explanation:
The user’s GitHub profile mentioned London as the location. Since GitHub profiles often contain voluntarily shared user data, I took that as the correct answer.
After i open the Github like the person is from London. See the below screenshort.

Q3: What’s the SSID of the WAP he connected to?#
Answer: UnileverWiFi
🗒️ Explanation:
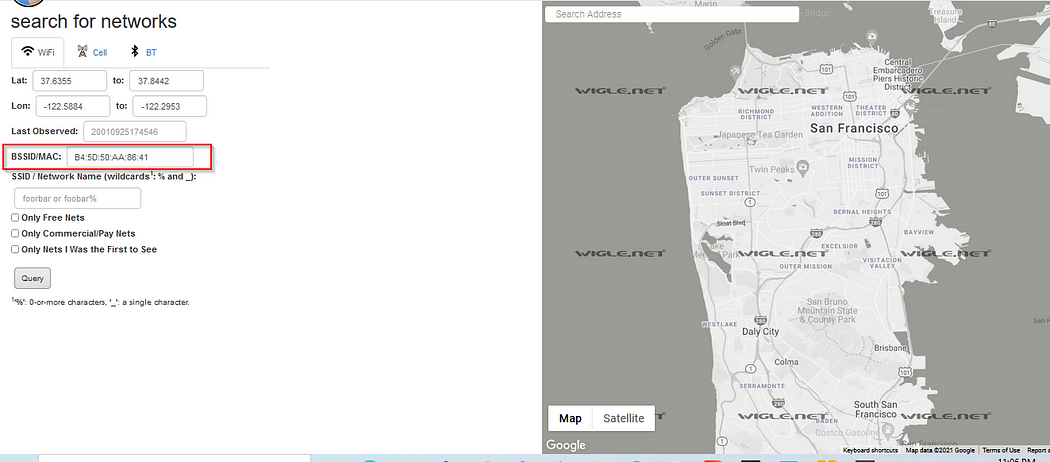
On Twitter, I saw the BSSID B4:5D:50:AA:86:41. I used Wigle.net to perform an advanced search by pasting the BSSID. The result showed the SSID name as UnileverWiFi, which is the name of the wireless network he connected to.
Ok, for wigle.net
- register to the website (you can put dummy account in here or create a fake puppet)
- Go to View > Basic Search
this is the Basic Search. As you can see here, it dosen’t work at all. We need to use the Advanced Search
- Use Advanced Search
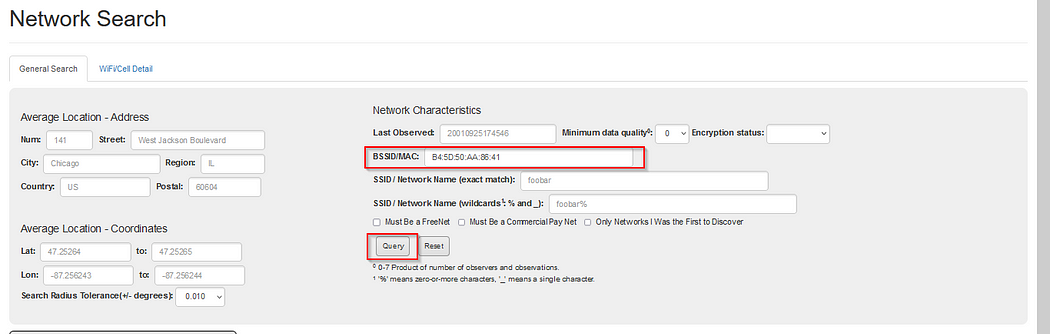
This is the Advanced Search, just paste the BSSID and query them’ remember to click the map.

This is what you got, just open the map.
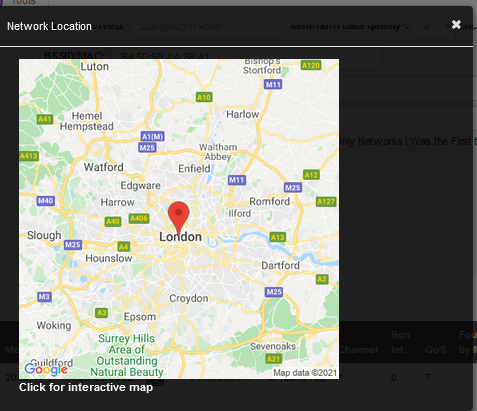
As you can see, it is in the middle of London
A2: London(the confirmation if it also london where the client come from)
Q4: What is his personal email address?#
Answer: OWoodflint@gmail.com
🗒️ Explanation:
can’t find the email on Twitter.I found this on the GitHub repo people_finder under the user’s GitHub profile. The email was visible in the readme or project details.
So, let us open the github account:

Q5: What site did you find his email address on?#
Answer: GitHub
regarding the screenshot above the answer is github
🗒️ Explanation:
The personal email was hosted on GitHub in one of the user’s repositories. This showed how easy it is to extract contact info from public developer platforms.
Q6: Where has he gone on holiday?#
Answer: New York
🗒️ Explanation:
i can’t the find the answer on github and twitter so i opened the blog .The user’s WordPress blog had a post that clearly mentioned New York as a vacation destination. It was a direct mention in the text content.

Q7: What is this person’s password?#
Answer: pennYDr0pper
🗒️ Explanation:
I took my time analyzing the final question, trying to determine both how to find the password and what it might be used for. After coming up empty on both Twitter and GitHub, I figured the WordPress blog was my best remaining lead. I then inspected the source code of the blog page, and that’s when I spotted a strange string of characters that looked like it could be a password.

This was hidden in the HTML source code of the WordPress blog. The font color was white, so it blended with the background. Using Ctrl + A selected all text on the page, revealing the password.
✅ Final Thoughts:
This OSINT room taught me how much can be revealed through metadata and public information. From just a JPEG image, I was able to find a username, trace them across multiple platforms, locate their city, discover their Wi-Fi network name, email address, travel history, and even their password.
🧠 A good reminder: Think before you post!
